Navigation : Home : FoveaPro : FoveaPro Tutorial : Part 22
Image Analysis Cookbook 6.0: Part 22
7. Automation
7.A. Photoshop Actions and Fovea Pro Logging
Photoshop provides capabilities for recording and playing back Actions, sequences of operations that can automate complex operations. All of the Fovea Pro plug-ins are compatible with actions: the operations are recorded along with any user selections or parameter settings, and those settings are used again when the action is played back. When used with other programs that support the use of Photoshop-compatible plug-ins, this capability is ignored but manual, interactive use is unaffected.
Actions are used to record a series of operations, so that you can document or repeat the process by which an image was manipulated, processed, thresholded, and/or measured. You begin the action recording by selecting New Action in the drop-down menu in the Actions window. You can name this action, and it will record all operations, even ones involving multiple images, until you select Stop Recording from the same drop-down menu. Each step is added to the action being recorded, along with all of the details (click on the small triangle next to the step name to reveal the various parameter settings).
Photoshop functions which can be included in actions either have no parameters at all (e.g., changing image modes, select all, etc.) or have input parameters (e.g., setting the size of a Gaussian smoothing neighborhood or the location of a selection region in the image). Those plug-in functions which fall into these categories behave similarly (e.g., performing an FFT requires no input parameters, generating a surface display requires entering several numbers and selecting radio button options in the dialog). When a step in an action has a dialog box associated with it in which the user can enter parameters, the action can either bypass the display and proceed using the parameters stored in the action, or display the dialog (with the input parameters previously selected set as the defaults) and wait for new input or for the user to proceed. This is identical to the use of Photoshop’s shortcuts to repeat the last function: press Control/Command - F to repeat an action with the previous settings, or Alt-Control/Option-Command – F to repeat an action but put up the dialog for user input.
To illustrate creating a simple but very useful action, consider setting up a function key to execute the very frequently used “Setup 2nd Image” function. The full step-by-step procedure is as follows:
1. There must be an image open in the program.
2. Be sure the actions palette is visible (if not, select Window –> Show Actions )
3. Click on the small triangle at the upper right corner of the Actions palette and select New Action from the drop-down menu.
4. Give the new action a descriptive name, and optionally assign it to a function key, such as F2.
5. Click record.
6. Perform each step of the action by selecting the functions in the usual way. For this specific case, which has only a single step, select IP•2nd image –> Setup 2nd .
7. Stop recording. Either click the icon (shown in red) at the bottom of the Actions palette or select Stop Recording from the drop down menu opened by clicking on the triangle at the top right corner of the palette.
8. The action is now ready for use. Pressing the F2 function key will execute it and place whatever image you have open into the second image storage location. You can also execute an action by highlighting it in the list of actions (click on the name) and then click on the triangle icon at the bottom of the action palette.
Actions can, of course, have many steps in them. Sometimes in the process of recording an action you may need to stop recording (press the round “stop” icon at the bottom of the palette), perform some other operations, and then resume recording (press the square “start” icon at the bottom of the palette). In other cases, you may find that the recorded action has extra, unnecessary steps included, or is missing steps (a common mistake is to assume that the foreground and background colors will be set correctly; it is always wise to set them appropriately in the action). If you need to edit an action, you can do so. To remove a step from an action, highlight the step and select Delete from the drop-down menu in the Actions palette. To add a step, click on the preceding step and then record the one(s) to be added, or click on the desired step in another action and drag it to the desired location (you can also use click and drag to move steps around within an action). Sometimes it is useful to first create a dummy action with the missing steps so they can be dragged into your action; the dummy action can be deleted later.
It takes a little bit of practice and planning to create a lengthy action and get it right, but it is definitely worth the effort because once created it can be used over and over to perform the same operations flawlessly and quickly. Recorded actions can be saved to disk (select the entire set of actions and use the Save Actions selection in the drop-down menu), loaded from disk (select Load Actions), edited (either by changing parameters for a step, or by dragging steps around in the action to change the order of operations, insert or remove steps, etc.), assigned to function keys, and called as steps by other actions. In fact, this last capability is particularly useful as it allows building up a “library” of subroutines that can be quickly assembled into a higher level process as needed. Actions are a basic tool for Photoshop users, and it is not the intent of this tutorial to duplicate the information on them provided in the Photoshop manual. One tip that is not widely documented is that depressing Command-Option (Mac) or Control-Alt (Windows) while saving an action set creates a text file listing all of the steps in your actions, which can be useful for documentation.
When a Fovea Pro plug-in has output data, it may either be in the form of a stored data file (e.g., IP•Measure Features–>Measure All Features ), data and/or graphics shown in a dialog (e.g., IP•Measure Global –> Clustering ), or both (e.g., IP•Measure Global –> Histogram ). If you set the action to pause at the dialog for the step, the dialog will be shown. If not, it will be bypassed. Data saved to a file will be saved to the same location as previously, which may be desired (e.g., appending measurements to an existing file) or may not (e.g., overwriting an existing file). Settings from dialogs are recorded in the action, and data and graphics shown in the dialog will be recorded if you are using logging in Fovea Pro (logging is not provided by The Image Processing Tool Kit).
Dialog data and graphics can be preserved using the IP•Utilities –> Setup Log File function. This is used to select a location for the files that are created and appended to. A tab-delimited text file is written into which each output value (along with a short text label) is written. If there are many such output values from a single action, they are all written unto a single line in the text file, with tab separators. The IP•Utilities –> Log New Line function should be placed at the end of the action. It writes the date and time to the file, and then a carriage return so that the next image processed by the action will have its data written to the next line. These text files can be easily read by any word processor and also opened by Excel, which will place all of the similar data values conveniently into columns. This is particularly suitable when performing batch operations. An html file containing the dialog graphics and data output is also created, and can be accessed with any html compatible reader such as Internet Explorer, Safari or Firefox. The graphics are linked to this index file but are saved as individual, sequentially numbered *.tif files and can be used in reports as desired.
As an example of an action that uses another action as a subroutine and logs the data to an output file for analysis, consider the task of measuring the brightness of a region in each of a series of images (loaded as layers) so that they can be combined in a ratio. The logging capability of Fovea Pro makes it relatively easy to accomplish this with actions. The steps of creating and using the action are:
1. In the Actions palette, click on the arrow for the drop-down menu, select New Action and give it a meaningful name. There will actually be two actions in this procedure so this one should be called something like “Setup”.
2. Since the action accesses the various layers by deleting them after they have been measured, the first step in your action should be to duplicate the entire image ( Image –> Duplicate ).
3. Select the log file for saving the data ( IP•Utilities –> Setup Log File –> Create New Log File )
4. Put in a Stop (select Insert Stop from the Actions palette menu, with the message to draw in the region of interest to be measured.
5. Draw the region of interest if you are doing this manually, or establish it by processing and thresholding to create a binary image. Note: If you do it the latter way, it is useful to have a separate action that will convert the binary image to a selection by Select –> All , Image –> Invert , Edit –> Copy , switch the selection display mode to Quickmask (by clicking on the quickmask icon in the tools palette or using the Q key as a shortcut), Edit –> Paste , and switch back to the normal selection mode (click on the standard mode icon in the tools palette or use the Q key as a shortcut). Since one action can be called as a subroutine by another action, you could insert this into the action at this point, but in this example I’m assuming you have probably used the manual outlining method to designate the region to be measured. Be sure that the topmost layer in the image is selected (the name should be highlighted in the actions palette, as shown in the example).
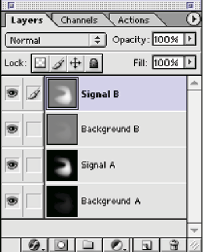
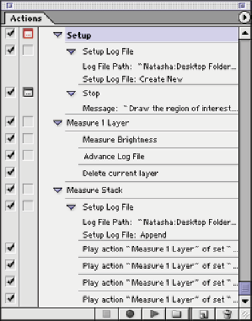
The Layers palette showing the images The completed actions
6. Stop recording the first action, and start a second, which we can call “Measure Stack”. This one does the actual work.
7. Tell the system to write data to the log file ( IP•Utilities –> Setup Log File –> Append to Log File ).
8. Use IP•Measure Global –> Brightness to get the mean luminance from the region of interest.
9. Place a carriage return in the log file ( IP•Utilities –> Log New Line ).
10. Delete the current layer in the image ( Layer –> Delete Layer ). This brings the next layer in the stack to the top and selects it as the active layer.
11. Steps 8, 9 and 10 must be repeated for as many images as there are in the stack. One way to simplify this (as shown in the example) is to make steps 8, 9 and 10 into an action, and then call this action as a subroutine as many times as there are layers. When you try to do this for the background layer you will be advised that you can’t delete the background, but this happens at the very end of the process and does not affect the data.
12. Stop recording the action.
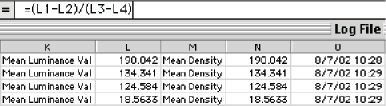
13. When the action is run on an image it will create a text log file that looks like the one below. It includes the red, green and blue values as well as the mean luminance and, if you have calibrated the density scale, the mean density.
14. This file can be opened in Excel (or another spreadsheet program). The ratio calculation might then have the form shown, which is (A–Background)/(B–Background) to calculate an intensity ratio with background subtraction. Obviously you can modify this according to the specific experiment you are performing.
Several example actions are provided on the Fovea Pro disk, and others are available on the ReindeerGraphics.com website.
7.B. Batch Processing
Actions can also be used to batch process images. In most cases these images will have been collected beforehand and saved in disk files, all placed within a single folder. It is possible in principle to include the acquisition in the batch processing but most acquisition plug-ins (e.g. for cameras or slide scanners) do not at this time support fully automatic operation, and Photoshop is not a convenient platform from which to automate hardware such as microscope stage controllers. However, since it is possible to completely control Photoshop, including actions and plug-ins, from Visual Basic or from Java programming, full automation of instrumentation is certainly possible (see Section 7.C).
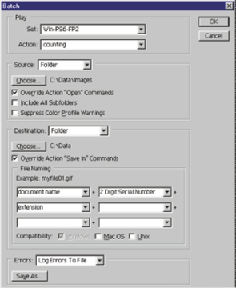
Select File –> Automate –> Batch to bring up the control dialog. The Set and Action refer to the action script that you have created. There can be multiple sets of actions loaded from disk, and multiple actions within each set. Since an action can call other actions as subroutines, as shown above, you can construct the final processing action by combining a number of operations that have been created previously. A typical action will perform whatever image processing is required, and then append feature measurement data to a disk file for later analysis. It is important to remember to append the data, or each measurement will overwrite the existing file. The action will usually be set to not display any dialogs for either input or output so that the batch process can run without attention.
The Source folder should contain all of the images to be processed. Checking “Override Action ‘Open’ Commands” tells the action to ignore any Open commands recorded in the action, so that all of the images are loaded from the selected folder (in alphabetical order). The same logic applies to the Destination selection. If the processed versions of the images are to be saved, you can create a folder to receive them and direct the batch process to save them there. You can also design the format for the names of the saved image files.
If your action does not save the image results (for example if you are performing measurements and writing the measurement data to a disk file, and then closing the images) you do not need to specify any destination information. Saving data (usually appending it) to files from the Fovea plug-ins uses the file name destination set in the action itself. Logging, as described above, will accumulate data from various measurement routines. You can choose either to have the batch process halt if an error occurs or to log the errors to a file and continue if possible.
In creating actions to be applied to batches of images, a few simple guidelines should be kept in mind. First, it is essential that the end point of an action leaves the same conditions as those expected at the beginning. This may include pen and background color selections, for example, and any open images. If an action is sequentially comparing each image in a folder to the next one (e.g., to implement a disector count through a stack of serial sections), then typically it will begin with one image open, and will open the next one. That means that at the end of the action the original image must be closed and the newly opened one must be reverted to its original condition.
Second, it can be very difficult to write a long and complex action that performs multiple analyses (some of these may contain a hundred or more steps) as a single entity. Since one master action can call other actions as subroutines, it is wise to create each of the individual components of processing and analysis separately, and debug them first. Then the master action can call them to produce the final batch result.
Third, although Photoshop actions will faithfully record your selection of individual images and layers, when you have many images open and switch back and forth between them, it is very easy to become confused and create a sequence while writing the action that cannot be correctly executed later when running it. It is best to close images whenever possible, and instead of keeping multiple intermediate images open, to use the ten image memories provided by Fovea Pro to explicitly store and recall images by number. The IP•Utilities–>Memory Store N and –>Memory Recall N functions in Fovea Pro (not provided in The Image Processing Tool Kit) are intended for use in constructing actions. They do not have anything to do with the 2nd Image–>Setup function used for various two-image operations, but simply provide explicit storage locations for images used in actions. (In running batch operations, you cannot store intermediate images or auxiliary images such as grids in disk files because the open commands will be overwritten by the batch procedure to access the designated folder.)
7.C. Scripting
Beginning with Photoshop version 8 (Photoshop CS), it is possible to completely control the host program and the plugins using a script written in Java. This is particularly useful if it is desired to write a routine that uses looping or branching (e.g., a decision based on the image contents might be used to select between different processing operations). The Photoshop documentation describes scripting, which is beyond the intent of this tutorial, and also provides a “Listener” plugin that constructs scripts while the program is used normally, which is a good way to learn about them. One script, provided on the Fovea Pro CD, is intended to be used in conjunction with the PCA routines. It is necessary to select all of the image channels before using these plugins. The manual procedure is to shift-click on the name of each channel in the channels dialog. The “IP_selectallchannels.js” script performs this operation automatically.
// make all channels visible and selected
if (documents.length > 0)
{
var docRef = activeDocument; //current document
var channelCount = docRef.channels.length; //number of channels in it
var aChannelArray = new Array(); //will build a list of channels
for (var i = 0; i < channelCount; i++)
{
docRef.channels[i].visible = true; //make it visible
aChannelArray[i] = docRef.channels[i]; //add it to the list
}
//activate the whole list of channels
docRef.activeChannels = aChannelArray;
}
else
{
alert("There must be at least one open document to run this script!");
}
The IP_SelectAllChannels javascript
Additional scripts provided on the Fovea Pro CD facilitate workflow for multichannel images. One script imports a folder of images as layers, and another will convert layers to channels. Both retain the original image names. There is also a script to automatically pad an image to the next larger power-of-two dimensions to facilitate performing Fourier transform operations.
There are two ways to access a script. One is to use the File->Scripts->Browse selection to locate the file and execute it. The second is to place the *.js file in the Photoshop “Scripts” folder (on the PC this would be located at C:Program FilesAdobePhotoshop CS2PresetsScripts following a normal installation; on the Mac it would be located at ApplicationsAdobe Photoshop CS2PresetsScripts by default), so that the script is listed by name in the File->Scripts submenu. It is also possible for an Action to call a script.