Navigation : Home : Optipix : Optipix User's Guide : Layer Modes
Optipix User's Guide: Layer Modes
One of the frustrating things about early versions of Photoshop (as well as other image programs) are their inability to handle layer compositing effects for 16 bit images. Reducing the image to 8 bits per channel allows you to work more easily with these images, at the cost of most of your image's dynamic range. This is extremely frustrating for people who need layers for aligning two images, or for simple processing, as opposed to graphics designers, who use layers to hold individual elements of a composition. Photoshop also does not provide any way to easily align images in increments less than a pixel.
Optipix solves these problems by providing Layer Modes, a plug-in that works around this issue by providing all of Photoshop's layer compositing modes (as well as some new ones of our own) using our 2nd Image Buffer, as well as a simple method for aligning images.
Using it is quite straightforward. Simply select the image you wish to be the "underlying" or "bottom" image, and use Filter > OPTIPIX > Setup 2nd Image to store it in the image buffer. Then select the image to be applied and choose Filter > OPTIPIX > Layer Modes to begin the work. A common use for this plugin would be to align two 16 bit images, so let's look at how we'd do that.
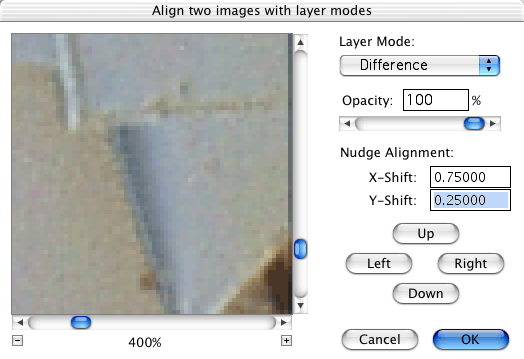
 Notice that the pop-up menu in the upper right shows that the plug-in is currently in Difference mode. At this point, you can use the arrow keys to nudge the image around, use the buttons in the lower right to nudge the image, or enter an offset in the boxes above the nudge buttons. In Difference mode, once the image is aligned, the result image shown in the proxy will be all black, or as close to black as possible.
The proxy has a zoom control underneath it. This zoom control, in addition to allowing you to close in on a particular portion of the image, changes the step size of the nudge. If you wish to move the image by fractional pixels, simply zoom in closer. At 200%, the nudge controls will move the image around by a half pixel. At 400%, it will shift the image by a quarter pixel. This allows you to zoom in and make fine corrections to the alignment of the two images.
Once you've aligned the images, you'll want to switch to one of the other modes, either Normal or whatever final mode you find useful. The menu shown to the right lists the available modes.
One of the uses of this plug-in is to align two images for using the Blend Exposures plug-in. In this case, once you have the image aligned, use Normal mode with 100% opacity to save the changes, then immediately choose Filter > OPTIPIX > Blend Exposures. Since the image buffer already contains the image you want to blend with the current image, the plug-in will give you the blended result without the artefacts that appear due to misalignment.
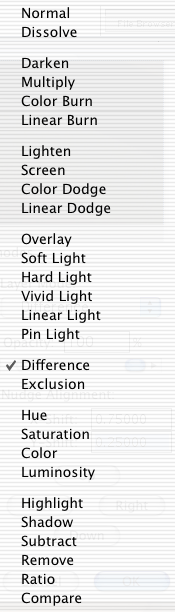
In addition to the usual blending modes from Photoshop, we've added a few more:
- Highlight: This keeps the brighter of the pixels between the two images. It is useful for removing shadows from a pair of exposures where the light source moved - Take two pictures with the lights in different locations leaving the camera position the same, then use this to remove the dark areas that are not common to both images.
- Shadow: This keeps the darker of the pixels between the two images. It is excellent for removing highlights on an object if the light is moved between the two shots.
- Subtract: This is the mathematical difference between two images instead of the absolute difference. It is easy to do embossing by aligning an image with itself and nudging the top image.
- Remove: This subtracts the luminance of the bottom image from the top image, leaving color alone. Theoretically you could use this to take a picture of a blank sheet of paper to correct brightness differences across an area. Take a picture of an object. Leaving the lighting unchanged, take a picture of a blank sheet of paper in the place of the object. This "background" or blank can then be removed from the first image solving problems with dark corners, etc.
- Ratio: This is the ratio of the two images. It works better than subtract for cameras with gamma correction. This can make it much easier to determine when the images are aligned when using the nudge buttons.
- Compare: This is similar to remove, but uses a ratio of the luminance instead of simply subtracting the luminance and should work better for gamma adjusted cameras. (This is a more perceptually uniform mode.)
It's easy enough for us to add more modes if reasonable uses can be established for them. Let us know what you think.
Next: Image Averaging
Prev: Interactive Interpolation
Up: Optipix