Navigation : Home : Optipix : Optipix User's Guide : Interactive Interpolation
Optipix User's Guide: Interactive Interpolation
Interactive Interpolation is a better means to add resolution to your images for the purposes of enlargement. The bicubic method used by Photoshop when you select Image > Image Size... and adjust the resolution of your image often leaves artefacts that are visually undesirable in the final print and can soften the image to unacceptable levels. Interactive Interpolation allows you to adjust the final output of the image in a preview before interpolating the whole image.
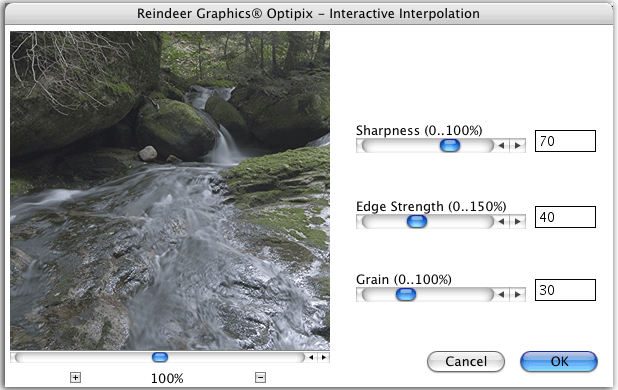
The Interactive Interpolation dialog is shown above. The sharpness slider allows you to determine for your individual image the level of crispness you want. The edge strength slider allows you to preferentially enhance the edges within the image. Edge fuzziness is a common defect that interpolation can cause, and this slider will allow you to add back some edge strength in order to correct it. The last slider lets you add edge grain. This is a technique that adds a bit of noise to the edges in order to break up any blockiness from the interpolation and to help make the regions on each side of the boundary visually distinct.
To use Interactive Interpolation on an image, you must first select Filter > OPTIPIX > Setup 2nd Image to place the image you want to enlarge (or reduce) in the 2nd Image buffer. Then, you can resize the image using Image > Image Size... to whatever dimensions you desire or you can create a new image with the appropriate dimensions. Interactive Interpolation will expand or reduce the image in the 2nd Image buffer to match the window that is active when you run the plug-in. This makes it easy to both enlarge to a specific resolution, dimension, or by a known percentage using Photoshop's built in tools to select the image size. It is usually a good idea to make sure the window that will receive the interpolated image is in 16 bit mode.
Once you have the destination window at the desired size, select Filter > OPTIPIX > Interactive Interpolation... and adjust the sliders until you are pleased with the result. Click OK to apply your interpolation parameters to the whole image. The result will be in perfect alignment with the original, so that layer processing will still be possible.
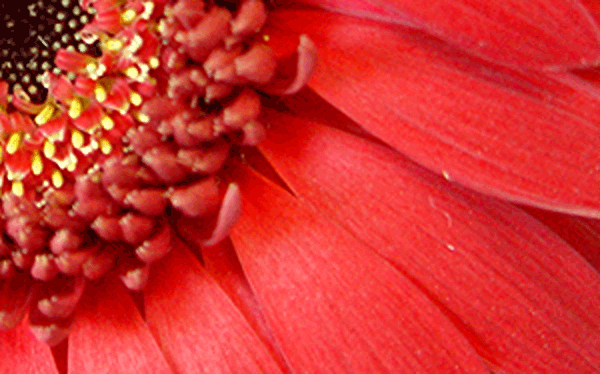
The following image is a part of a flower, that has been enlarged 200% using Photoshop's built-in tools. Notice the softness in the dark area in the upper left hand corner, and the fuzziness in the petal edges.

After running Interactive Interpolation, the quality of the image is much improved. The edges are crisp and distinct, and the fine detail is sharper.
Next: Layer Modes
Prev: Blend Exposures
Up: Optipix